If you have been running Proxmox VE for a while, you may notice that some of your older virtual machines are configured with an older Machine version.
For example, a VM created several Proxmox releases ago might still be using a machine type such as:
pc-i440fx-7.2
or:
pc-q35-8.1
even though the Proxmox host now supports considerably newer versions.
Unlike updating Proxmox VE itself, updating a VM’s machine version isn’t something you necessarily need to do every time a new version becomes available. However, there are situations where upgrading it is useful — and eventually it may become necessary.
In this article, we’ll look at what the machine version actually does, why you might want to upgrade it, and how to safely change it.
What Is the Proxmox VM Machine Version?
Despite how it might sound, the Machine setting isn’t the version of your operating system or even really the “version” of your VM.
Proxmox VE uses QEMU/KVM to provide virtual machines. The machine type defines the virtual motherboard and hardware layout presented to the guest operating system.
You’ll generally encounter two families of machine types:
- i440fx — the older, very widely compatible virtual chipset.
- q35 — a newer virtual chipset with PCI Express support and other more modern hardware characteristics.
Each of those can also have a version associated with it.
For example:
pc-i440fx-8.1
means that the VM is using the i440fx machine type while emulating the hardware behavior associated with QEMU’s 8.1 machine version.
This versioning is intentional. QEMU occasionally changes its virtual hardware implementation as bugs are fixed and features are added. Proxmox can keep a VM on an older machine version so that upgrading the Proxmox host doesn’t suddenly change the virtual hardware that the guest sees.
This is particularly important for Windows.
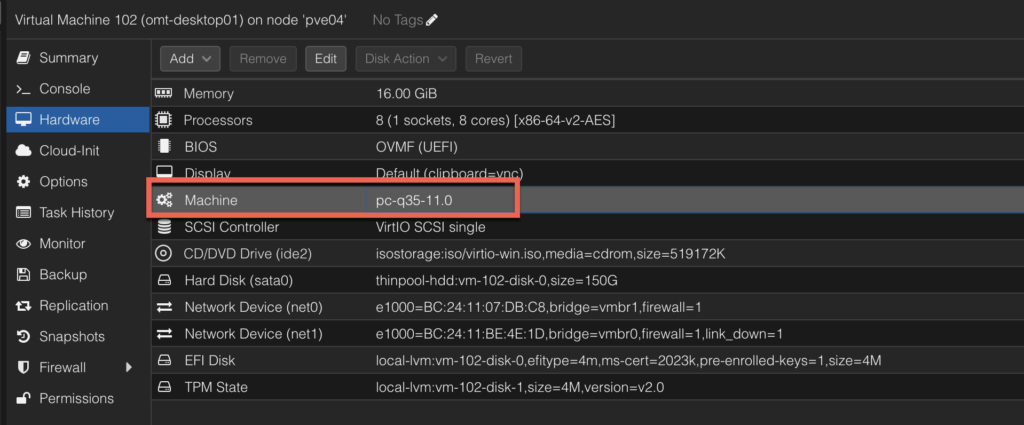
Proxmox automatically pins Windows VMs to a specific machine version because Windows can be sensitive to changes in hardware enumeration.
Why Would You Upgrade the Machine Version?
There isn’t usually a reason to update every VM simply because a newer machine version appears in the dropdown.
In fact, if the VM works perfectly and Proxmox isn’t warning you about its machine version, leaving it alone is often perfectly reasonable.
There are several circumstances where upgrading makes sense, though.
1. Proxmox Is Warning You That the Machine Version Is Deprecated
This is probably the most compelling reason.
Proxmox specifically recommends updating the machine version if you receive a deprecation warning. Old machine versions cannot necessarily be supported forever, and very old versions can eventually disappear from future versions of QEMU or Proxmox VE.
If you’re several generations behind, it’s better to deal with the VM during a planned maintenance window rather than discover after a future Proxmox upgrade that your old machine configuration is no longer supported.
2. You’re Preparing for a Major Proxmox VE Upgrade
I tend to look at machine versions when preparing older installations for a major Proxmox upgrade.
Imagine a VM that was originally created years ago, survived several Proxmox releases, and is still pinned to the machine version that existed when it was first created.
The guest operating system may have been upgraded multiple times, but its virtual motherboard configuration hasn’t changed.
Before moving the entire Proxmox environment forward again, it can make sense to bring especially old VM configurations up to a reasonably current machine version.
Proxmox has specifically advised checking for machine versions that will no longer be available before major upgrades.
3. You Restored or Migrated an Old VM to a New Proxmox Host
This is another common scenario.
Suppose you have a VM originally created on Proxmox VE 6 or 7 and eventually restore it onto a much newer Proxmox installation.
The disks and operating system may work perfectly, but the VM configuration can still contain the older QEMU machine version.
That backward compatibility is a good thing — it is one of the reasons the VM can still boot normally — but once you’ve confirmed everything is working on the new environment, you may decide to modernize the virtual hardware as well.
4. A Newer Machine Version Provides Something You Need
Occasionally, QEMU or Proxmox features depend on a minimum machine version.
One example documented by Proxmox is USB hotplugging, which has machine-version requirements for certain guests.
Newer machine versions can also contain fixes to virtual hardware behavior.
This doesn’t mean upgrading the machine version is a magic performance button. You generally shouldn’t expect a dramatic increase in CPU or disk performance simply by changing it.
Think of it more like updating the motherboard revision of a physical machine.
5. You’re Cleaning Up a Long-Lived Proxmox Environment
Production virtualization environments have a tendency to accumulate history.
You may eventually find something like:
- VM 101 — machine version 6.1
- VM 102 — machine version 7.2
- VM 103 — machine version 8.1
- VM 104 — Latest
Nothing is inherently wrong with this, but it can make future upgrades more complicated.
During planned maintenance, bringing especially old virtual machines up to a newer supported baseline can reduce the amount of legacy configuration you’re carrying forward.
When Should You NOT Upgrade It?
There are also some good reasons not to immediately change the setting.
The most obvious is:
The VM works, its machine version is supported, and you don’t need anything provided by a newer version.
There is little benefit in introducing a virtual hardware change just for the sake of having the highest number in the dropdown.
You should also be cautious with VMs running software that is sensitive to hardware changes.
That could include:
- Windows activation
- Software licensed against hardware identifiers
- Appliances with unusual virtual hardware assumptions
- Older operating systems
- VMs using PCI or GPU passthrough
- Very old Windows installations
Machine-version changes can affect the hardware topology visible to the guest. Proxmox maintains the version system specifically to avoid unexpectedly making those kinds of changes.
Windows deserves particular caution. Proxmox introduced automatic machine-version pinning for Windows specifically to keep its virtual hardware layout consistent across QEMU upgrades.
Before You Upgrade
Treat a machine-version upgrade like any other virtual hardware modification.
Before doing anything, I recommend:
- Make sure you have a current backup.
- Verify that the backup completed successfully.
- Schedule a maintenance window for an important VM.
- Record the current machine type and version.
- Make sure you have console access through Proxmox in case the guest loses network connectivity.
For an especially important VM, taking a screenshot of the current Proxmox hardware configuration isn’t a bad idea either.
You can also view the configuration from the Proxmox shell.
For a VM with ID 101:
qm config 101
Look for the machine: entry.
For example:
machine: pc-q35-8.1
How to Upgrade the Machine Version in Proxmox VE
Changing the machine version through the Proxmox web interface is straightforward.
- Select the VM in the Proxmox VE interface.
- Open Hardware.
- Select Machine.
- Click Edit.
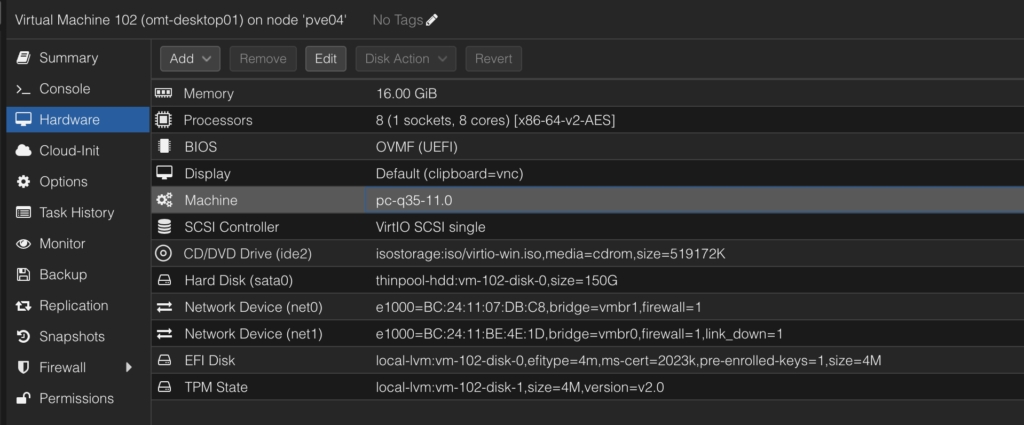
You’ll see the machine type and the versions available on your Proxmox host.
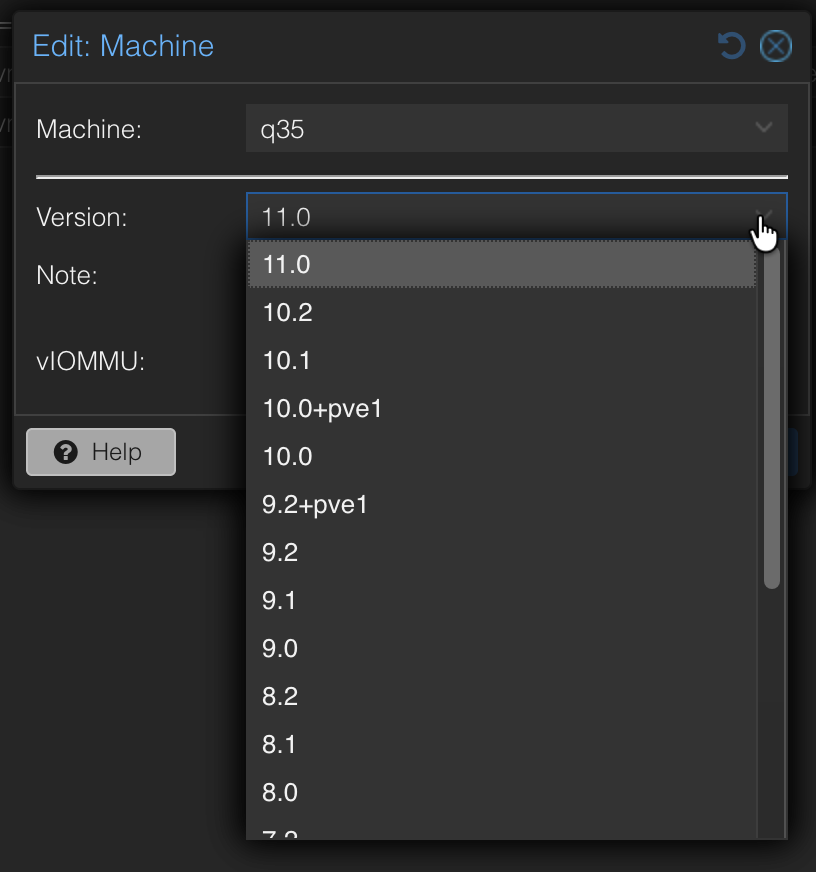
At this point, you have a couple of decisions to make.
Don’t Change i440fx to q35 Just Because You’re Updating the Version
This deserves special attention.
Changing:
pc-i440fx-7.2
to:
pc-i440fx-[newer version]
is a machine version upgrade.
Changing:
i440fx
to:
q35
is a machine type change.
Those are two different operations.
If the goal of your maintenance is simply to update an old machine version, I recommend keeping the existing machine type.
In other words:
i440fx → newer i440fx
or:
q35 → newer q35
Changing from i440fx to q35 can be useful, particularly when you need PCIe-oriented features or certain passthrough configurations, but that should be treated as its own migration rather than casually combined with a machine-version upgrade.
Making one major virtual hardware change at a time also makes troubleshooting considerably easier.
Choosing a Version
You’ll generally see several supported versions as well as a Latest option.
For a Linux VM, using Latest may be perfectly appropriate depending on your environment.
When Latest is selected, the VM can use the newest applicable machine version after a fresh start as the underlying QEMU version changes.
For Windows servers and other important production systems, I generally prefer explicitly pinning the machine version.
That gives you a known virtual hardware configuration rather than allowing it to move automatically when the virtualization stack changes.
This is essentially the same philosophy Proxmox uses when it automatically pins Windows guests.
Select the desired version and save the change.
Then restart the VM.
Updating the Machine Version From the Command Line
You can also perform the same operation using qm.
For example, if VM 101 is using Q35 and you want to set it to machine version 10.0:
qm set 101 --machine pc-q35-10.0
For an i440fx VM:
qm set 101 --machine pc-i440fx-10.0
The exact versions available depend on the QEMU/Proxmox version installed on your host, so check what your system supports rather than blindly copying a version number.
You can inspect the resulting configuration with:
qm config 101
Start the VM and Check Everything
Once the VM starts, don’t just see a login screen and declare victory.
Check the services that actually matter.
For a Windows Server VM, for example, I would check:
- Network connectivity
- IP configuration
- Device Manager
- Disk visibility
- Windows Event Viewer
- Application services
- Windows activation
- VirtIO devices
- Any hardware-bound software licensing
For Linux:
ip addr
lsblk
lspci
systemctl --failed
If it’s a database, web server, domain controller, file server, or another critical service, verify the actual application as well.
Machine-version changes have historically caused guest hardware to be enumerated differently in certain circumstances. Proxmox even maintains documentation describing compatibility issues associated with particular historical QEMU machine-version changes.
That is exactly why I recommend having a backup and testing the guest afterward.
What About a Proxmox Cluster?
Clusters add another consideration.
Don’t update a VM to a machine version that some of your nodes cannot support if you expect that VM to migrate or fail over to those nodes.
For example, suppose you have:
pve01 — newer Proxmox/QEMU
pve02 — newer Proxmox/QEMU
pve03 — older Proxmox/QEMU
If you select a machine version that only exists on pve01 and pve02, you may prevent the VM from starting on pve03.
In a cluster, I prefer to upgrade the Proxmox nodes first, confirm that every node that may run the VM supports the desired machine version, and then update the guests.
This is especially important in HA environments.
Can You Go Back?
This is why writing down the old version and taking a backup matters.
If the new machine version causes problems, shut the VM down and change the Machine setting back to its previous version.
For example, if you changed:
pc-q35-8.1
to:
pc-q35-10.0
and the VM behaves strangely, shut it back down and restore the previous machine version.
That said, don’t rely on rollback as a substitute for a backup.
If the guest operating system itself reacts to newly detected hardware or modifies its configuration after booting, simply changing the virtual motherboard version back may not undo every change made inside the guest.
Should You Upgrade Every VM?
No.
I wouldn’t log into a Proxmox server, see that a VM is two machine versions behind, and immediately upgrade it.
My rule is closer to this:
If it isn’t deprecated and I don’t need a newer machine version, there probably isn’t an urgent reason to touch it.
But if I’m already performing maintenance, upgrading Proxmox, migrating an old VM, or dealing with a machine version that’s approaching obsolescence, then updating it makes sense.
The important thing is understanding that this setting represents virtual hardware compatibility, not simply another software version number.
A Practical Example
Let’s say you have a Windows Server VM originally created several Proxmox releases ago.
Today it looks something like this:
VM: 101
OS: Windows Server
Machine: pc-q35-7.2
Your current Proxmox installation supports much newer QEMU machine versions.
The VM works, but you’re preparing for another major Proxmox upgrade.
This is a good maintenance opportunity.
I would:
- Back up VM 101.
- Verify the backup.
- Record
pc-q35-7.2as the current machine configuration. - Shut down Windows cleanly.
- Open Hardware > Machine.
- Keep the machine type set to q35.
- Select a newer supported machine version.
- Start the VM.
- Verify network adapters, disks, Device Manager, application services and Windows activation.
- Leave the VM running on the new version once everything checks out.
If there is a problem, shut it down and return the Machine setting to pc-q35-7.2.
That’s considerably safer than waiting until some future Proxmox upgrade forces you to deal with a decade’s worth of virtual hardware changes at once.
Final Thoughts
The Machine setting is one of those Proxmox options that’s easy to overlook because most of the time you never have to touch it.
That’s largely by design.
Proxmox and QEMU use versioned machine types to allow the virtualization platform underneath a VM to evolve without constantly changing the hardware presented to the guest.
For long-lived virtual machines, though, eventually you’ll encounter systems pinned to much older machine versions.
When that happens, don’t simply select the newest option and hope for the best. Back up the VM, keep the same machine family unless you have a reason to change it, update the machine version during a maintenance window, and verify the guest afterward.
It’s a simple change in the Proxmox interface, but it’s worth remembering what you’re actually changing:
You’re upgrading the virtual motherboard underneath the operating system.